Pages

Monday, February 10, 2014

Chicken and rice casserole.

I love one pot meals, in this case one dish meals! And who doesn't?
I found this recipe on Pintrest but made adjustments to fit my taste buds. 
While the original was fine I almost always tweak every recipe. This one is super easy and super quick to make. ( and please excuse my extremely dirty oven! Lol)

Ingredients:
Casserole base:
1 medium onion chopped
1 small can cream of celery soup
1 small can of cream of chicken soup
2 cups brown minute rice
1 Tbls garlic salt
1/2 tsp nutmeg
1 Tbls pepper
1 cup of water
1 cup of cheddar cheese
Chicken Coating:
1 packet of Pork flavored Shake N Bake
1 Tbls garlic powder
1/2 Tbls Old Bay seasoning
1 tsp dried sage
1 tsp onion salt
1/2 tsp nutmeg
1 tsp chicken seasoning
1 tsp pepper
And chicken breast of course!

Preheat oven to 375 degrees. Mix all of the casserole base ingredients in a separate bowl and spread evenly in the bottom of a 9x13 baking dish lined with heavy duty aluminum
 foil. (I'm all for easy cooking and easy clean up!)


Coat the chicken in Shake N Bake mix and lay on top on of the casserole base. 
Sprinkle the remaining mix on top of the chicken and casserole base. 
Bake in oven for one and a half hours until casserole base is yummy bubbly and the breading is toasty brown!


Let it rest for 5-10 mins and presto! Your dinner is done! And the best part ( besides the delicious meal your about to consume) is that after you've licked the dish clean, there's no soaking or scrubbing to get the baking dish back to its original splendor! ENJOY! 


Bubble Party!

So last night my daughter found a bottle of bubbles and begged and begged for me to open them. Little did she know, but I had bought a bubble gun a couple weeks ago because the one we had last year broke. I was waiting for it to warm up and stop raining outside but I couldn't resist the adorable little faces that she was giving (you moms know the look I'm talking about!). So I broke out the bubble gun from hiding and we had a SUPER fun bubble party in the kitchen! I just wanted to post some of my favorite pictures! 
Popping bubbles!

                                                   
She's CRAZY about the bubbles!


The BEST Spaghetti Sauce

Sorry for the gap between posts, sick baby=busy mama! But now that I have some time I HAD to share my spaghetti sauce recipe. This one is an original, not a tweaked recipe and it took a long time and many failed attempts to perfect it! Ever go to an Italian restaurant and be craving spaghetti only to be disappointed by flavorless sauce? Well that issue does not exist here! This sauce is SOOOOO good that you might just forget the noodles because you will be eating it right out of the pot! I hope you enjoy! 


Ingredients:
1-1.5 pounds of extra lean ground beef (the picture shows almost 4lbs- I'm using the rest for chili) 
1 green pepper chopped
2 sm/med onions chopped
1 large jar of your favorite classic flavored pasta sauce. (No meat or veggie flavored sauce)
10 cloves of garlic chopped-I know it sounds like a lot but we are OBSESSED with garlic, so feel free to decrease the amount
Dried Italian seasoning
1 box of your favorite spaghetti- I used thin spaghetti


Heat olive oil in pan and sauté onions, peppers and garlic until onions are tender. Season liberally with salt, pepper and Italian seasoning.


Clear a spot in the middle of the pan and add the ground beef. Liberally season with salt, pepper and Italian seasoning. The key to yummy food is to season EVERY layer! After seasoning, mix veggies with the beef and cook till meat is completely browned. 


Now here's the fun part! Take that metal "wavy" potato masher and mash your little heart out! Mash until the meat is broken apart and consistently the same size. Then add the entire container of pasta sauce, season with salt, pepper, italian seasoning and simmer for the length of time that it takes to boil the water and cook the noodles. Now there is always variations to this recipe. You can not add the meat and be all veggies, just add different colored peppers. Sometimes I keep the meat and all the colored peppers. Or you could add Italian sausage along with the ground beef. Feel free to make it your own! 


Pom Pom Sorting

I absolutely LOVE this activity for my daughter! Not only does she practice her colors, counting, and sorting but this entertainment was super cheap at only $2.50 for everything! I got the 6 cup muffin tin at Walmart for $1.50 and the Pom Poms at Hobby Lobby for $1! 


Place 1 Pom Pom of each color in their own cup. And pour the rest into a bowl. I used the top of her play food bucket.


And let the fun begin!


Crockpot Shredded BBQ Chicken Sandwiches with Cole Slaw

Short on time to make dinner? This is an awesome set and forget recipe that will please the masses!


Ingredients:
Boneless skinless chicken breasts
1-2 bottles of your favorite BBQ sauce
1/3 c Worcestershire sauce
1/2 of a large red onion chopped
1 bag 3 color cole slaw
Pre made cole slaw dressing or make your own
1 Tbls Pepper
( I usually make my own slaw dressing but I didn't have enough time due to a sick baby)


Mix the BBQ sauce with the Worcestershire sauce. ( I used 1 bottle for three chicken breasts)
Lay some of the sauce mix on the bottom of the crockpot, then lay the chicken in the crockpot and pour the remainder of the sauce in. Move the chicken around so that all the chicken is completely coated. Cook on low for 7-8 hours or on high for 4-5.


Pour cole slaw mix into bowl and toss together with chopped red onion. Mix in cole slaw dressing, just enough to evenly coat the slaw and onion. Add pepper and mix. Place in fridge until ready to use. Make at least 1 hour ahead so that flavors can meld together. 


Shred chicken with two forks and place back into crockpot and stir to coat in sauce. Cover and cook for 10 mins to heat chicken through. Place on toasted bun and top with cole slaw. (We also like to drizzle Texas Pete on top of sandwich). Presto dinner is done!


Sensory Bin

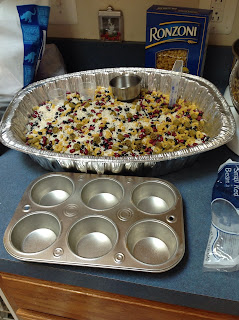
I love activities that are cheap and entertain my daughter for hours. Sensory bins can be made out of pretty much anything. I just went to the grocery store and bought what ever was on sale. (The pasta was BOGO!)


I got a turkey roasting pan for $1! I got two different types of pasta, wagon wheels and macaroni. I also got a bag of rice, a bag of black beans and small red beans. I mixed each whole bag of beans and half of the others. 


This is what ours looks like. I just put scoops in and gave her a muffin tin to fill.


And to make cleanup easier I spread a flat bed sheet, that we use for making forts, on the floor.
She had a blast! And it entertains ALL ages. My brother (who is 19 ) came over and got lost in playing with the bin!

After she played with it in the metal pan I poured it all in a container with a lid for storage and future use. (Pictured below)


DIY Gymnastics Balance Beam

My daughter has recently started her first session of gymnastics and I've been thinking of ways to get her to practice some of the things shes learned, at home. Well, of course my mind started to twitch the second I stepped into the gym and I began breaking things down and coming up with ways to construct them at home. And my balance beam was born. 
What you'll need: 


A 4x6x8 board
A 1x4 cut into 18inch pieces
Carpet pieces-I used inexpensive woven rugs 
 Staple gun
Staples
Hammer
Nails


Wrap the carpet or rug around the post, leaving some at the end of the board to wrap. Staple the rug to the SIDES of the board. Don't staple it to the top! You don't want tiny toes getting hurt if one pops out of place! Then flip it over, pull the carpet tight and staple it to the bottom of the board. Cut off any excess material. Continue to do this with the rest of the material until the whole board is covered. 

Don't forget to leave some on the ends to wrap around. 


Cut off the extra carpet on the bottom, just leave the top part to wrap around the bottom and then staple it to the board.


Now nail the 1x4 boards to the bottom. I used four and spaced them equally apart.


Now flip it over and PRESTO you have your very own floor balance beam! And hundreds less than the professionally made ones! SCORE!